OutSystems standards and guidelines at Synobsys
Standards, best practices and how-tos for developing OutSystems applications
ODC Recipe - Create an Entity and Data Actions
A data action is a piece of logic that performs a create update or delete action on one or more entities.
Contents
- ODC Recipe - Create an Entity and Data Actions
Exposing data with ODC
Contrary to O11 in ODC entities are always exposed read only and server actions are not public.
The rule is to expose entities read only and to use Service Actions to expose the CRUD operations.
CRUD Templates
We use the CRUD templates application from the forge to speed up and standardize the creation of Entities and Data Actions.
The template has the following elements:
Template Entity
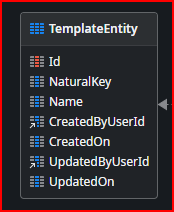
The template entity has the following attributes:
| Attribute | Description |
|---|---|
| Id | A generated UUIDv7 primary key (TODO replace GenerateGuid() with UUID7 available on 21-11-2023.) Why Auto Increment Is A Terrible Idea describes why we chose UUID in favor of Auto Increment.See also Primary Keys: IDs versus GUIDs and Goodbye integers. Hello UUIDv7! |
| NaturalKey | A natural key is an attribute that exists in the real world or is used by the business. It can be used to uniquely identify the row. An example of a natural key is a Social Security Number (for US citizens). It’s usually a unique number that applies to a person, and has a use for tax purposes. |
| Description | A text attribute describing the entity instance |
| CreatedByUserId | The Id of the user who created the record. |
| CreatedOn | DateTime the record was created |
| UpdatedByUserId | The Id of the user who updated the record. |
| UpdatedOn | DateTime the record was updated. We use this attribute to handle concurrent updates as described in How To Handle Concurrent Updates on Application Data Records |
Unique NaturalKey index
An index to ensure the uniqueness of the natural key.
TemplateEntityDbActions
The following CRUD wrappers are available:
- TemplateEntityCreateOrUpdate- Create or update a valid record.
- TemplateEntityDelete - Delete a TemplateEntity record
- TemplateEntityValidate - Performs the TemplateEntity record validation
:warning: These actions do not contain authorization checks. Make sure these actions are not exposed to anonymous screens. You should create your own business logic that provides the proper interface and authorization checks!
:warning: When invoked by a timer, bpt or API there is no logged in user.
Utility Actions
:bulb: You may want to put these actions in a library for reuse.
- NotificationListConcat - Concatenates a list of notifications to one string using StringBuilder.
Adding a new entity and data actions to an application
Preparation
if you haven’t done it on a previous occasion, follow these steps:
- Install the [CRUD Templates application] from the forge.
- Switch to the logic tab (Ctrl+3) and copy the Utility Actions to your application or library:
NotificationListConcat
- Add a ValidationException to <Your Application>
- Add a ConcurrentUpdateException to <Your Application>
Creating the new Entity
:warning: WARNING: Do NOT publish the application before instructed to do so.
- Open <Your Application>
- Open the CRUD Templates application
- Go to the data tab (Ctrl+4)
- Select TemplateEntity and copy it
- Switch to <Your Application> and paste the TemplateEntity
- Rename TemplateEntity to the <new entity name>
- Open the entity editor and enter a proper description for the entity.
- In the entity editor open the More options and set the:
- Label
- Label (plural)
- Order by attribute
- Check that the entity and all the attributes have proper descriptions.
Add database actions for the new entity
- Switch to the CRUD Templates and go to Logic tab (Ctrl-3)
- Make sure the folder TemplateEntityDbActions is collapsed
- Copy folder TemplateEntityDbActions and Paste it in <Your Application> logic tab
- Go to Data tab (Ctrl-4) and locate the TemplateEntity in the Stencil_DBActions_Pat referenced module
- Find all usages of the TemplateEntity (F12)
- Use the button: Replace all instances to replace with your new entity (select in the popup)
- Remove the TemplateEntity dependency (Del)
- Using (Ctrl + R): find string “TemplateEntity” and replace all occurrences with your <new entity name>
- Using (Ctrl + R): find string “TemplateEntities” and replace all occurrences with your <new entity name> plural form. E.g. Products.
- Fix the errors by replacing the missing entity actions with <new entity name> entity actions and the exceptions;
- ‘GetTemplateEntityForUpdate’
- ‘CreateTemplateEntity’
- ‘DeleteTemplateEntity’
- ‘UpdateTemplateEntity’
- ValidationException
- ConcurrentUpdateException
Rename the natural key attribute
A natural key (also known as business key or domain key) is a type of unique key in a database formed of one or more attributes that exist and are used in the external world outside the database (i.e. in the business domain or domain of discourse). In the relational model of data, a natural key is a super key and is therefore a functional determinant for all attributes in a relation. From Wikipedia Natural Key
- Designate a meaningful name to the Natural Key for your entity and using (Ctrl + R) find string “NaturalKey”and replace all occurrences with that name.
- Fix the errors one by one by clicking on each of them.
- If the natural key is a composed of multiple attributes change the <UniqueNaturalKey> index and the validation actions accordingly.
- When done, check all the Reminder TODO comments (shown as warnings in the TrueChange tab) and remove them when OK.
- Check that there are no warnings and reminders in the TrueChange tab
Add additional attributes
- Add any additional attributes and set the properties:
- Name
- Description
- Data Type
- Is Mandatory
- Add validation logic for each new attribute in the Validate server action.
- 1-Click publish your module.
Exposing Data Actions
If there is a requirement to modify the data from within another domain or application you can expose the data actions as service actions or as an API.
Creating Data structures
For external resources we don’t want to expose the full entity record. Therefore we create a so called canonical data structure.
- Open the data tab (Ctrl+4) and select and copy <new entity name>
- Paste it inside the Structures Tab
- Rename the structure to <new entity name>CS (Canonical Structure)